Building Wixie templates - Best practices
Over the past 14 years of Wixie, we have built a lot of templates for students. Here are some things that we have learned that you will hopefully find helpful in your own templates.
Page Layout
Landscape vs. portrait orientation. It is almost always better to create templates using landscape orientation. This layout works best on a variety of devices. Portrait layouts become hard to work with in the work-space of a tablet, so try to use this orientation only when designing templates that will need to be portrait when they are printed.
Text Objects
Text layouts. Try not to be pixel-perfect with your text layouts. Make sure you have space for the text to be a little smaller or a little larger. Different browsers on different devices display fonts at slightly different sizes. Don't get hung up on exact text layouts, it is a losing battle.
Default text. Sometimes the default text in an empty text object is not what you need. “Type text here” may not be as useful as “Type your name” or “Name the region”. You can edit the text that is shown in an empty text object. Select the text object, and then go to the Edit menu and choose Edit Default Text. If you want the text object not to show any text at all, enter a space in the dialog.
Lock labels and headers. If you have labels and headers, turn off scaling and lock these items. This way they won’t get inadvertently edited, but if another teacher wants to customize your activity, they can easily unlock the labels and edit them. Go to the Edit menu, choose Properties and select Lock and turn off Scale.
Page Objects
Objects to be dragged. If you are creating a sorting template with text objects or stickers on the page that are to be dragged around, go to the Edit menu, choose Properties, and turn on Protect and turn off Scale. This will make the objects easier to drag around without inadvertently deleting or scaling them. This is especially useful if students are doing the template on a touch device.
Clone objects you need more than one of. If you are making a counting template, or a template where students are working with money, instead of adding multiple copies of a sticker to the page, add one copy and go to the Edit menu, choose Properties, and select Clone. This way each time students click and drag the sticker it will create a new copy giving them an endless supply.
Edit the name of an image. Each image has a yellow handle that when you click it, the computer speaks the name of the image. You can edit this name to make sure it is exactly what you need. Select the image, then go to the Edit menu, choose Properties, and select Edit Alt Text.
Instructions
Instructions vs descriptions. If you are providing instructions to students, click the Instructions button on the tool palette and enter instructions for students to read. If you want to provide detailed instructions to teachers on how to use or possibly customize your template, choose the File menu and select Project Information. What you enter in the Description field will display to teachers when they are looking for activities in the Detail view of the project list.
Use device neutral terms in the instructions. Try to use terms that are understood on both tablets using a touch interface and PCs using a mouse interface. For example, instead of saying “Click and drag”, use “Drag” as it is a more device neutral term that is easily understood on both a PC and a tablet. Instead of saying “Click” when describing an action, such as “Click the Paint tool”, use “Choose” or “Select”.
Hyperlinks in the instructions. If you need to include information from another web site, you can type a full URL in the instructions field. When you are in editing mode as a teacher, the link will not open. But, rest assured, students will be able to select the link and have it open content in a new tab when they use it. Creating a URL in the instructions area is helpful if you want to reserve more space on the page for students to work.
Recording your instructions. Wixie will use the browser’s text-to-speech to let students listen to the instructions that you have typed. If you do not like the TTS voice, you can also record yourself reading the instructions, or providing additional information, using the record button on the instructions panel.
Instructional videos. If you want to record a video and use that for instructions, you can use the Video button on the toolbar to add the video. Either record the video in Wixie, or if you created a screencast video in another program, you can import that into your template. You might want to consider creating a multi-page project with the video instructions on the first page and the template on the second.
Project Settings
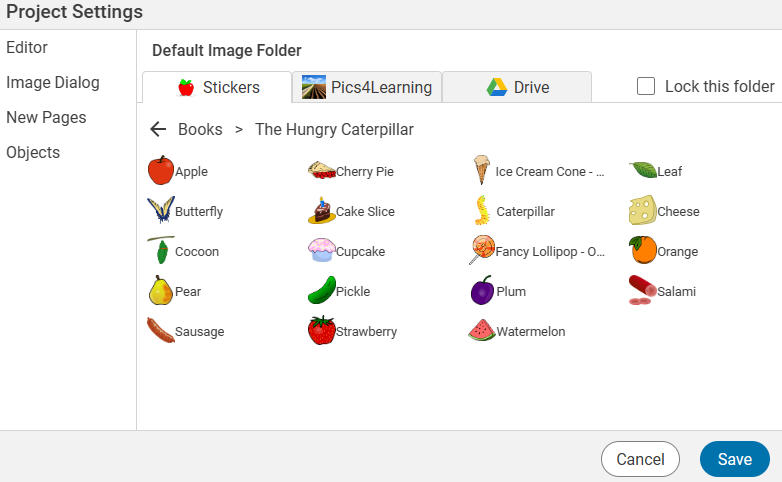
Set a default sticker category. If there is a specific category of stickers that works best with a template, such as the Numbers category in Math, you can have this category open when the image dialog is opened. This makes it easier for students to get started without having to navigate the library. To set the default folder, go to the File menu and select Project Settings. In the Project Settings dialog, choose the Image Dialog option and then navigate to the folder you want to set as the default.
Customize the tools students can use. Not all templates need all of Wixie’s tools. Hiding some of Wixie’s options that are not needed for your template can help simplify the template for students and keep them from getting distracted from the desired task. This is especially useful for younger students. To choose what tools are available in the template, go to the File menu and select Project Settings.
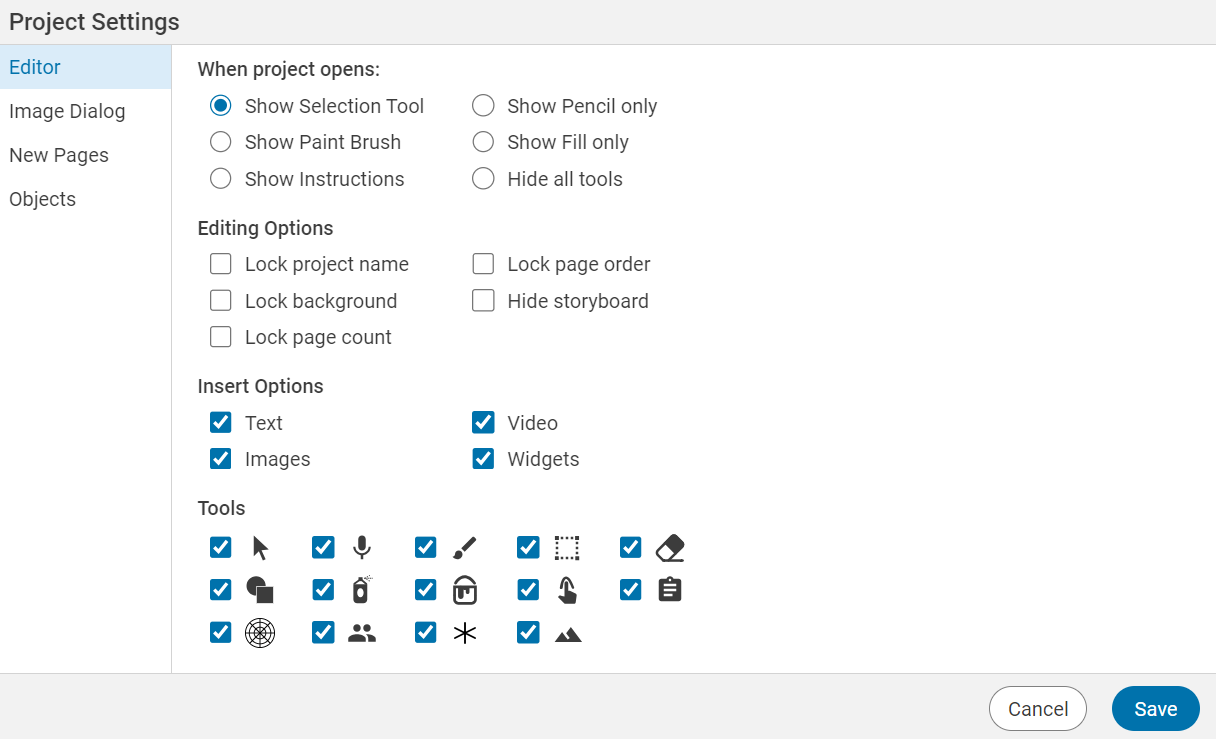
Explore all of the options in this dialog to find the perfect combination for your template.
Note: If you choose to Hide All Tools and have instructions you want students to see or want them to use the Done button, be sure to activate the Open to Instructions option on the Instructions panel.
More ideas
Take advantage of the background layer. One of the more subtle features in Wixie is the difference between the background, paint, and objects layers. Since the background layer in Wixie exists behind everything, students can quickly and easily add text, stickers, and even painted artwork above it without “damaging” the image.
If your template would be harder to use if students accidentally erased part of it, design that part first, then go to the Edit menu and choose Send to Background. This will make that part of the template untouchable. The background layer sits behind the paint layer, so make sure you don't ask students to fill a shape that is in the background, since the paint bucket fills the paint layer and if shapes are on the background, the bucket will fill the entire page.
Multiple page templates. If your page looks cramped with a lot of stuff, can you break it up onto multiple pages? There is no rule that says a template can only be one page.
Sharing Templates
Sharing with teachers in your school. Once you have done the work to customize or develop your own templates, share them with other teachers at your school and/or district so they can use them in their own classes. Find the template you have created and use the three dots to the right of it to choose Move to. In the Move dialog, navigate to your school folder (one level to the left) and choose Copy Here to share with the other teachers at your site. Depending on the permissions set by your district, you may also be able to copy to your district folder.
Sharing with teachers outside your school/district. You can also share your templates with teachers outside of your school or district by sharing the URL to the project you have created. Copy it from the URL field in your browser, or go to the File menu and choose Share to email to a colleague. When they open the URL, they can use the Log in button in the upper right to log into their account and then use the File menu and choose Make a Copy to add it to the My Projects folder in their Wixie account.
Sharing on sites like Teachers Pay Teachers. If you want to share the templates you have made on a site like Teachers Pay Teachers, you can download your template and then upload it to that site. Go to the File menu, choose Download, and then select Wixie. If you want to upload several templates as a group of files, download them into a folder and then zip the folder and upload it.
 Effective Integration
 Instructional Design
 Learning Strategies
 Literacy
 Month-by-Month
 Product Ideas
 STEM/STEAM
 Share and Showcase
 Updates
 User Management